Delving the depths of computing,
hoping not to get eaten by a wumpus
By Timm Murray
2018-03-27
The Perl Raspberry Pi ebook campaign is now live! Steve Bertrand, the author of the excellent RPi::WiringPi module (among other RPi modules), has agreed to help.
The aim is to not just hand you a bunch of prebuilt modules that connect to temperature sensors and accelerometers and such. In CPAN tradition, there are quite a few modules already. But there will always be more, and it’s important that people know how to implement new hardware themselves. It’s admittedly not the easiest skill to learn (or to teach, for that matter), but I’m hoping we can get some new people hacking away, helping CPAN expand into whole new areas.
2018-03-27
Device::WebIO was originally based on a Python project, WebIOPi. It duplicated the REST API (with some slight corrections), which means it was built around the pull-style system of HTTP.
I wanted to expand it to MQTT, which means doing more push-style. It’s not a difficult addition, but it does need to be able to track input pins using async interrupts.
So version 0.020 is released, with the Device::WebIO::Device::DigitalInputAnyEvent. This sets up the basics of putting an async loop together with the hardware portion. Next step is to integrate this into Device::WebIO::RaspberryPi, and then write Device::WebIO::MQTT to take advantage of all this.
2018-03-05
I guess the title says it all.
We’re well past the time when Perl should have an ebook about programming on the Raspberry Pi, so let’s fix that. I’d like to get a feel for what people will want to get out of this.
It will probably be based around Steve Bertrand’s series of RPi::* modules. We’ll expand from there into web projects (Device::WebIO::Dancer), capturing from the camera (GStreamer1), and interfacing with Arduino (Device::Firmata).
For i2c/SPI examples, we’ll show how to interface directly with some low-cost sensors. Tentatively, these will be an accelerometer for SPI (ADXL345) and a temperature sensor for i2c (MPL115A2). Both are available with breakout boards from Adafruit and Sparkfun.
Then there will be real project examples, such as a garage door opener and a temperature logger.
Here’s my chapter outline so far:
-
Introduction
-
RPi Models, Basic Setup, and Tools/Hardware You Need
-
GPIO [blink an LED, read from a switch, pullups/pulldowns]
-
SPI [ADXL345 accelerometer?]
-
i2c [MPL115A2 temperature sensor?]
-
Camera [GStreamer1]
-
Serial [GPS]
-
Expanding with Firmata
-
Interfacing from the Web [Device::WebIO]
-
PWM and Analog Input
-
Asynchronous code
-
Build Project: Garage Door Opener
-
Build Project: Temperature Logger
And there’s even a start on a cover:
2018-02-01
Let’s say you had an API that served JSON. Some of the responses don’t change very often. Perhaps something like user data:
{
  "uid": 12345,
  "addresses": [
    {
      "state": "SC",
      "city": "Mayberry",
      "street": "1234 Lalaberry Lane",
      "zip": 12345
    }
  ],
  "lname": "Smith",
  "fname": "John"
}
It’s an obvious case where caching could help. Perhaps you stick the data in memcached and write it out directly from your app.
This means you’re still hitting application code. Wouldn’t it be nice if you could have nginx write the cached data back to the client as if it were a static file? This is possible using a ramdisk and nginx’s try_files.
Start with this little Mojolicious app:
#!perl
use v5.20;
use warnings;
use Mojolicious::Lite;
use File::Spec::Functions 'catfile';
use Cpanel::JSON::XS 'encode_json';

use constant CACHE_FILE_PATH => 'html';
use constant CACHE_DATASTRUCTURE => {
    uid => 12345,
    fname => 'John',
    lname => 'Smith',
    addresses => [{
        street => '1234 Lalaberry Lane',
        city => 'Mayberry',
        state => 'SC',
        zip => 12345,
    }],
};
use constant CACHE_JSON => encode_json( CACHE_DATASTRUCTURE );

get '/ramdisk/*' => sub {
    my ($c) = @_;

    sleep 5;

    my $url_path = $c->req->url->path;

    my $path = catfile( CACHE_FILE_PATH, $url_path );
    # TODO SECURITY ensure $path is actually under the absolute path to
    # CACHE_FILE_PATH, cleaning up any '..' or other path miscreants
    open( my $out, '>', $path )
        or die "Can't write to $path: $!\n";
    print $out CACHE_JSON;
    close $out;

    $c->render(
        data => CACHE_JSON,
        format => 'json',
    );
};

get '/direct/*' => sub {
    my ($c) = @_;
    $c->render(
        data => CACHE_JSON,
        format => 'json',
    );
};


app->start;
This provides two paths to the same JSON. The first one, /ramdisk/*, will write the JSON to a path we specify under our nginx root. This has a deliberate sleep 5 call, which simulates the first request being very slow. The second, /direct/* is for benchmarking. It dumps some pre-encoded JSON back to the client, which gives us an upper limit on how fast we could go if we pulled that data out of memcached or something.
(If you use this code for anything, do note the security warning. The code as written here could allow an attacker to overwrite arbitrary files. You need to ensure the place you’re writing is underneath the subdirectory you expect. I didn’t want to clutter up the example too much with details, so this is left as an exercise to the reader.)
Save it as mojo.pl in a directory like this:
$ ls
html
mojo.pl
The html dir will be the place where nginx serves its static files. Create html/ramdisk and then mount a ramdisk there:
$ sudo mount -t tmpfs -o size=10M,mode=0777 tmpfs html/ramdisk/
This will give you a 10MB ramdisk writable by all users. When the mojo app above is called with /ramdisk/foo, it will write the JSON to this ramdisk and return it.
Now for the nginx config. Using try_files, we first check if the URI is directly available. If so, nginx will return it verbatim. If not, we have it proxy to our mojo app.
worker_processes  10;


events {
    worker_connections  1024;
}


http {
    include       mime.types;
    default_type  application/octet-stream;

    sendfile        on;
    tcp_nopush     on;

    keepalive_timeout  65;

    server {
        listen       8001;
        server_name  localhost;

        root html;

        location /ramdisk {
            default_type application/json;
            try_files $uri $uri/ @cache_build;
        }

        location @cache_build {
            proxy_pass http://localhost:8002;
        }
    }
}
Start this up and call http://localhost:8001/ramdisk/foo. If the file hadn’t been created yet, then that sleep from earlier will force it to take about 5 seconds to return a response. Once the file is created, the response should be nearly instant.
How “instant”? Very instant. Here’s the result from ab of calling this 100,000 times, with 100 concurrent requests (all on localhost):
Concurrency Level:      100
Time taken for tests:   4.629 seconds
Complete requests:      100000
Failed requests:        0
Total transferred:      37300000 bytes
HTML transferred:       13400000 bytes
Requests per second:    21604.02 [#/sec] (mean)
Time per request:       4.629 [ms] (mean)
Time per request:       0.046 [ms] (mean, across all concurrent requests)
Transfer rate:          7869.43 [Kbytes/sec] received

Connection Times (ms)
              min  mean[+/-sd] median   max
Connect:        0    2   0.5      2       6
Processing:     1    3   0.6      3      10
Waiting:        0    2   0.6      2      10
Total:          2    5   0.6      5      13

Percentage of the requests served within a certain time (ms)
  50%      5
  66%      5
  75%      5
  80%      5
  90%      5
  95%      5
  98%      6
  99%      7
 100%     13 (longest request)
And the results from calling the mojo app with /direct/foo:
Concurrency Level:      100
Time taken for tests:   87.616 seconds
Complete requests:      100000
Failed requests:        0
Total transferred:      28500000 bytes
HTML transferred:       13400000 bytes
Requests per second:    1141.34 [#/sec] (mean)
Time per request:       87.616 [ms] (mean)
Time per request:       0.876 [ms] (mean, across all concurrent requests)
Transfer rate:          317.66 [Kbytes/sec] received

Connection Times (ms)
              min  mean[+/-sd] median   max
Connect:        0    0   0.3      0      17
Processing:     8   88  32.7     88     174
Waiting:        8   87  32.7     88     174
Total:          8   88  32.7     88     174

Percentage of the requests served within a certain time (ms)
  50%     88
  66%    101
  75%    111
  80%    117
  90%    132
  95%    142
  98%    152
  99%    157
 100%    174 (longest request)
We took 88ms down to just 5ms. This is on an Intel Core i7-6500 @ 2.5GHz.
If you’re wondering, I didn’t see any benefit to using sendfile or tcp_nopush in nginx. This may be because I’m doing everything over localhost.
What I like even more is that you don’t need any special tools to manipulate the cache. Unix provides everything you need. Want to see the contents? cat [file]. Want to clear a cache file? rm [file]. Want to set a local override? EDITOR-OF-CHOICE [file].
Now to go find a use for this.
2017-09-29
Recently, my makerspace got a new laser cutter that can fit 4x2 foot plywood sheets. This means I can redo our arcade’s control panel with a design in OpenSCAD. Here’s the mockup:
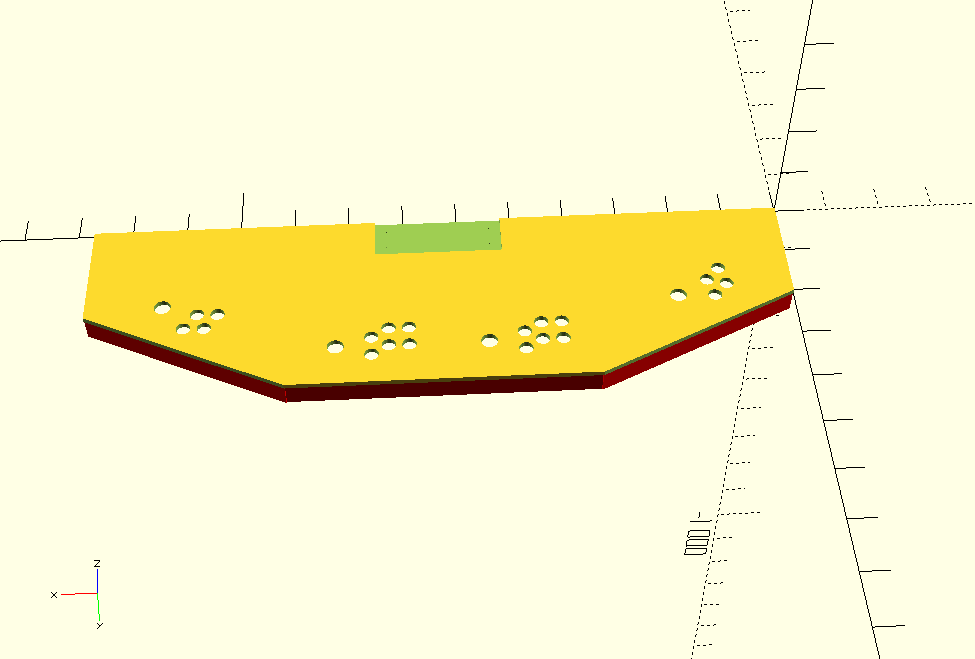
The design is based on the old X-Men 6-player cabinet, though the final build got cut down to 4-players for space reasons. The red areas you see on the bottom are keepout sections for the structure underneath. There’s also a cutout in back, which is for a built-in keyboard. It’s 3/8 inch thick, and intended to be made from two layers of 1/8 inch plywood plus 1/8 inch acrylic on top.
Now, how do you go from an OpenSCAD file to a laser cutter?
In theory, you can have OpenSCAD generate an STL file, and then import that into a 3D printer slicer. A slicer’s job is to take a 3D model, break it into 2D slices, and then generate the printer head’s path for each slice. So you might think that you can set the slicer to have a layer height of 1/8 inch, and then have it output some kind of vector file format for each slice. Slic3r does indeed have an SVG output, which gives you hope.
Your hope will soon be dashed as you run into impedance mismatches. First, Slic3r wants the nozzle diameter to be larger than the layer height. We’re not going to be dealing with a physical nozzle here, but we have to set it to a ridiculous size (like 10mm) just to make Slic3r happy. Once we get past that, we get our SVG output in a single file with multiple layers. Slic3r’s SVG output is meant for resin 3D printers, and isn’t going to work well for laser cutters. What we want is one file per layer with simple paths, not filled-in.
It turns out we can hack our own slicer with OpenSCAD’s projection() command, combined with importing an STL. It works like this:
projection( cut = true )
    translate( v = [ 0, 0, -0.1 ] )
        import( "arcade_control_panel.stl" );
The translate() brings the object’s Z coord down by -0.1mm. The projection() command then creates a 2D slice of whatever intersects at Z axis zero. Note that you need the cut = true here. Without it, OpenSCAD creates the projection as a kind of shadow of the entire object, rather than whatever is on the Z axis.
That gets us a vector image like this:

If we loaded the code above into OpenSCAD, compiled it, and exported to a vector file like SVG or DXF, we would get the slice of the 0.1 layer. Then we’d have to do -0.1 - 3.175 (3.175mm is about 1/8 inch), compile and export, and then again for the third layer. This is too much manual effort, even for just the 3 layers I need for the control panel. I would never want to do it for something like a terrain piece.
Fortunately, OpenSCAD has a command line interface for compiling and exporting models. What we can do, then, is programmatically create the OpenSCAD projection code, run the command line, and get each layer in turn.
Which is exactly what Laser Slicer does. Here’s how to run it:
$ python laser_slicer.py --input arcade_control_panel.stl --end-height 7 --start-height 0.1 --layer-height 3.175
Input file: arcade_control_panel.stl
Output type: dxf
Start slicing height: 0.1
End slicing height: 7.0
Layer height: 3.175

==========

Creating layer 1 at height 0.1
    Outputting to arcade_control_panel.stl_1.dxf
Creating layer 2 at height 3.275
    Outputting to arcade_control_panel.stl_2.dxf
Creating layer 3 at height 6.45
    Outputting to arcade_control_panel.stl_3.dxf
We put in a start height of 0.1 (you might get weird results if you try to start with zero), then go up 3.175mm each step, ending whenever we go above 7mm. It then generates 3 dxf files, one for each layer. It’s probably slower per layer than 3D printer slicers, but since the layers are thicker, it doesn’t need to generate as many of them.
All code on Github now.
2017-05-02
Games::Chipmunk, the Perl bindings for the Chipmunk 2D graphics library, are now at version 0.5.
There are no changes to the bindings themselves in this version, but there is an example Pachniko program:
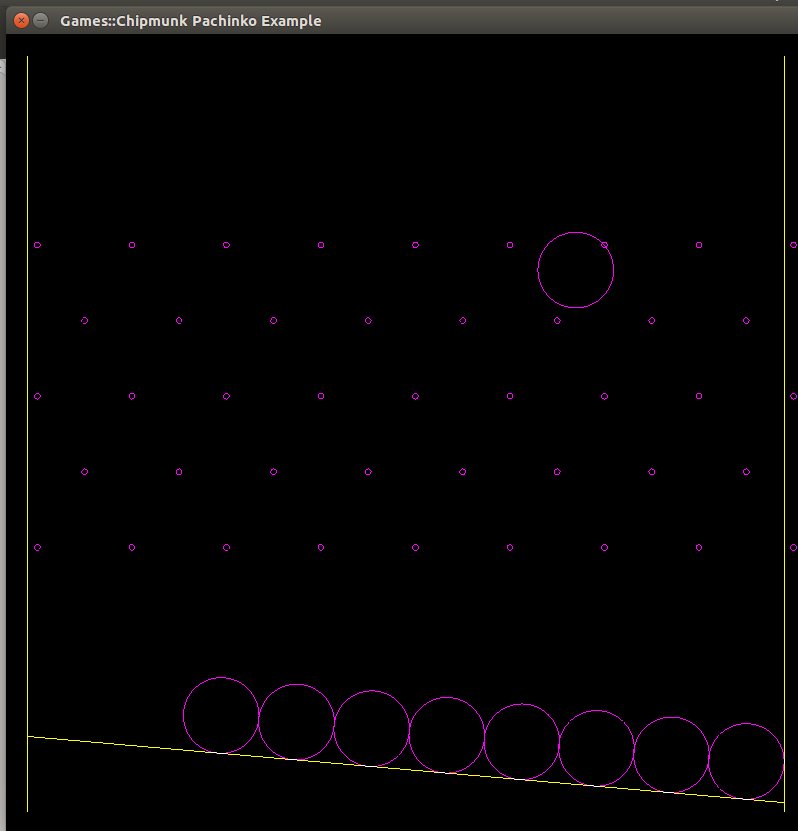
You click the mouse to drop a ball in that spot, and away it goes. Things seem to be at the point of doing real games with it.
2017-04-04
Updates are easy, too.
    my ($sql, @sql_params) = UPDATE 'foo', SET(
            op( 'bar', '=', 1 ),
            op( 'baz', '=', 2 ),
        ),
        WHERE match( 'qux', '=', 3 );
UPDATE takes a table to update, followed by SET and WHERE. In SET, we’re using the op function, which is actually an alias for match. Calling it op is more readable here, since we’re not matching anything. Note that the data there is still handled as placeholders.
The WHERE part works just like it does in SELECT.
2017-04-01
We can build an insert statement easily, too.
    my ($sql, @sql_params) = INSERT INTO 'foo',
        [
            'bar',
        ],
        VALUES [
            1,
        ];
INTO takes a table, which it feeds to INSERT. The INSERT function likewise takes a list of table columns (in an array ref), followed by VALUES, which itself takes an arrayref of the data you’re going to put into the columns. All the scalars in that arrayref are passed back in @sql_params and filled in as placeholders.
Inserting with a subselect is supported, which we will cover later.
2017-03-27
It seems like it should be easy, but I was always disappointed with how other solutions handle arbitrarily nested ANDs and ORs. Most SQL creation libraries seem to start by adding support for a list of AND statements. At some point, the authors realize they need ORs, so they slap that in. Much later, they realize they need to mix ANDs and ORs, and then all sorts of convolutions get written.
With SQL::Functional‘s approach, nesting ANDs and ORs together is as natural as straight SQL. First, we’ll back up a few steps and demonstrate the ANDs:
    my ($sql, @sql_params) = SELECT [qw{ bar baz }],
        FROM( 'foo' ),
        WHERE AND(
            match( 'bar', '=', 1 ),
            match( 'baz', '=', 2 ),
        );
Notice that unlike SQL, the AND is a prefix rather than infix. This might take some getting used to, but it does mean you can pass it an arbitrary number of statements:
    AND(
        match( 'foo', '=', 1 ),
        match( 'bar', '=', 2 ),
        match( 'baz', '=', 1 ),
        match( 'qux', '=', 8 ),
        ...
    )
In the final SQL, all of these will be joined together with AND. The OR statement works the same way:
    OR(
        match( 'foo', '=', 1 ),
        match( 'bar', '=', 2 ),
        match( 'baz', '=', 1 ),
        match( 'qux', '=', 8 ),
        ...
    )
If we need to mix the two together, we just do that:
    AND(
        OR(
            match( 'foo', '=', 1 ),
            match( 'bar', '=', 2 ),
        ),
        OR(
            match( 'baz', '=', 1 ),
            AND(
                match( 'qux', '=', 8 ),
                match( 'quux', '=', 10 ),
            ),
        ),
    )
Thus, the nesting falls naturally out of the system, just like it should be.
2017-03-24
SQL::Functional now has reasonably complete converge of common SQL statements. There’s always going to be something else to add, but the main thing it needs now is a cookbook of standard cases. Along those lines, I thought I’d start up a series of blog posts that can be compiled into a complete cookbook.
We’ll start with a basic SELECT statement.
One of SQL::Functional‘s strong points is in making easy jobs easy. Its other strong point, making hard jobs possible, will be covered later.
    my ($sql, @sql_params) = SELECT [qw{ bar baz }],
        FROM( 'foo' ),
        WHERE match( 'bar', '=', 1 );
Let’s break down what’s actually going on. The SELECT function takes a scalar for all the fields, so we have to pass it as an arrayref. FROM takes a list of tables, which we might do for joins, but we’ll just pass it one for now. WHERE takes a list of clauses.
Ideally, we could say something like:
WHERE bar = 1
But that would require deep Perl voodoo (e.g. source code filters), so we content ourselves with the match function to build the same thing. It also helps us here by having the matched data passed as a placeholder.
In the end, $sql will contain:
SELECT bar, baz FROM foo WHERE bar = ?
With @sql_params containing the data for all the placeholders. We can run this through DBI like any other statement:
    my $dbh = DBI->connect( ... );
    my $sth = $dbh->prepare_cached( $sql )
        or die "Error preparing statement: " . $dbh->errstr;
    $sth->execute( @sql_params )
        or die "Error executing statement: " . $sth->errstr;
    while( my @row = $sth->fetchrow_array ) {
        say join ', ', @row;
    }
    $sth->finish;
Easy.
← Prev
Next →
Copyright © 2024 Timm Murray
CC BY-NC
Opinions expressed are solely my own and do not express the views or opinions
of my employer.